Our Wordpress blog is a useful tool for publishing marketing information and one we wanted to keep in our new site as it provides useful information for customers as well as helping to keep the content of the site fresh.
We didn’t necessarily want all the features of Wordpress so beloved of developers the world over, just the content posts, assets and a means of querying the different categories we’d set up.
We used the JSON_API plugin to do the job. It installs into a wordpress instance and exposes a number of REST methods allowing our rails controller to fetch and parse the blog content efficiently (caching it for performance). The plugin doesn’t include any authentication options but if you only enable the get methods it’s no more public than a hosted Wordpress site.
There were a few small customizations to Wordpress we added - essentially to disable frontend access so that the content only appears in the context of our main website. Splitting the content management off into a separate service like this both fits with the SOA structure of Easyart and means our editors can add and edit content without affecting anything that might be happening on the rest of the platform.
Leave a comment
A couple of days ago I wrote about turning your CSS into a ruby gem. Since then my colleague John suggested that I add Bourbon and Neat as dependencies, as the SCSS included in the gem will not work without them.
So, once again I was faced with a new challenge - and once again it turned out to be fairly simple in the end.
I won’t go into details about the different kinds of dependencies you can use in a gem, the rubygems guide does a better job of that than I would, but the process is the same either way.
In your <gem name>.gemspec file, you just need to add the following:
    spec.add_dependency "bourbon", ">= 3.1.4"
    spec.add_dependency "neat", ">= 1.3.0"
Obviously the name and version number of the gems you include here will be whatever you are using on your project.
The next, and final step is to go to lib/<gem name>.rb and require your dependencies at the top of the file, underneath your <gem name>/version require statement:
    require "bourbon"
    require "neat"
And that’s it. Next time you (or someone else) uses your gem, the dependencies will be installed without having to include them separately.
Leave a comment
In our never-ending mission to make our codebase more maintainable, we decided to package up our shared CSS into a gem so we can use it on all of our projects easily, without having to worry about things going out of sync.
This seemed daunting to me, as I’d never done anything like this before, but after some reading and googling, I found it wasn’t actually that complicated. Here’s how I did it:
What you’ll need
- Ensure rubygems is up to date by running
gem update --system from your terminal
- Install bundler by running
gem install bundler
- A github repo for the gem
- An account on Rubygems
Creating the gem
Note: I’ve called my gem craven, so wherever you see this, you should replace it with the name of your gem.
You can use bundler to create the scaffolding for your gem. All you have to do is run:
bundle gem craven
Believe it or not, this is almost good-to-go, but we need to do a small amount of config first.
Open the file craven/lib/craven.rb and edit it so it looks like this:
    require "craven/version"

    module Craven
        class Engine < Rails::Engine
        end
    end
Now open the file craven/craven.gemspec and fill out any sections containing TODO:. I also set the homepage to my github repo:
spec.homepage = "http://github.com/easyart/craven
Adding your assets
Now you can add your assets to the gem. Assuming your assets are intended to be used as a library, you should use the vendor directory structure, so all your stylesheets are included in craven/vendor/assets/stylesheets/craven/.
Bumping the version number
Now you are almost ready to publish your gem, but each time you do, you will need to bump up the version of your gem, otherwise it will fail. You can do this in craven/lib/craven/version.rb.
Publishing the gem
Now for the exciting part - you’re about to publish your first ruby gem. To do this, just run:
bundle exec rake release
This will publish the gem and push your changed to github. The first time you do this you will be prompted to fill out some credentials. From then on, all you will have to do is run the above command to publish changes to your gem.
Leave a comment
We’re excited to welcome Steve Fuller to the Easyart tech team, as a result of our acquisition of assets from Picture Cabinet Ltd. Steve was responsible for building Picture Cabinet’s platform that powers a large number of print on demand sites, apps and kiosks and will undoubtably be a valuable addition to the team.
Leave a comment
Summary
Known by many names; the auto-complete, typeahead, search suggestion or incremental search box is an invaluable feature of any website. An example of it’s use would be to find the latest news about Lance Armstrong. If you Google only the partial words “lan” and “arm” Google will be smart enough to fill in the blanks.

The project
The project I’m about to explain was done for an internal administration menu here at Easyart.

Over the years our admin has grown so large that a simple list of pages was simply too long to navigate. Even after grouping
and hiding them under dropdown menus we thought there must be a quicker way of getting to a specific page.
An auto-complete input field would fit the bill.
A typical auto-complete setup
A typical setup might use Twitter’s Typeahead library which does an ajax call to a server which receives the partial search term and returns matching records. The results are displayed in real-time as a list of options and are updated on each keypress.
But there’s a problem
Firstly, you need to know the exact spelling of the words you are after. Many auto-complete libraries search from the beginning of words. If you miszpel your target term, you are out of luck. Good luck to sports writers wanting to find Jhonny Peralta’s batting average on your Dominican Major League baseball blog.
Also, if you have many records that start with the same phrase, and your auto-complete only shows the top 10, how do you find the one that you know is there but is hidden at number 15?
A better way to search
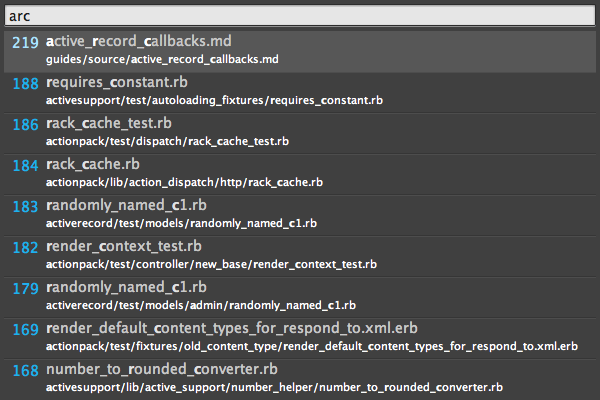
If you’ve ever used the Sublime Text editor you’ll be familiar with the “search anywhere” paradigm. To find a file, normally you would go to the search box and type filename.txt, then hit search, then off it would go to hunt down your file. But with “search anywhere” you can find what you want in a fraction of the time.
For example, to search the Rails source code for the file “active_record_callbacks.rb” you could type:
- “arb” which matches “active_record_callbacks.rb”
- “reccall” which matches “active_record_callbacks.rb”
- “arec” which matches “active_record_callbacks.rb”

There are only two rules:
- All letters must be in the name of the item (obviously)
- Letters must appear in the correct order
So how do we do this in code?
The typical auto-complete setup will take the input and (after sanitising of course) ask the database with a “like” query to find matches.
select * from table_name where description like "%QUERY%";
This does an ok job, but it’s not perfect. It’s just not as flexible or fast as it could be.
Our solution
Positive zero-length lookahead assertions of course!
Come back for Part Two of this post for the code.
Leave a comment


